We’ve all heard of the classic boiled egg, but have you ventured into the delightful world of shio yudetamago? This Japanese delicacy transforms the humble egg into a flavor-packed snack, seasoned simply with salt. It’s a testament to the beauty of minimalism in Japanese cuisine, where each ingredient is allowed to shine.
Shio yudetamago, or salted boiled eggs, might sound straightforward, but it’s the precise technique that elevates it to something you’ll crave at all hours. Perfect for breakfast, as a snack, or even as a side dish, these eggs are a versatile addition to your culinary repertoire. Join us as we dive into the art of making shio yudetamago, ensuring your eggs are perfectly seasoned and cooked to perfection. It’s a simple pleasure that’s bound to become a staple in your kitchen.
Ingredients
To make shio yudetamago, you’ll need a handful of simple ingredients. Here’s what you need to get started.
For Shio Yudetamago
- 4 large eggs, preferably fresh to ensure ease of peeling
- 2 tablespoons of sea salt, fine grain works best for an even coating
- 4 cups of water for boiling
- Ice water bath, for stopping the cooking process immediately after boiling
- Light soy sauce, for a deeper umami flavor
- Sesame seeds, toasted for a nutty crunch
- Spring onions, finely chopped for a fresh, piquant finish
- Chili flakes, for those who prefer a spicy kick
Equipment Needed
To embark on the culinary adventure of making shio yudetamago, you’ll need some basic kitchen tools that most of us already have on hand. Here’s a rundown of the essential equipment to ensure your boiled eggs come out perfectly seasoned and delicious every time.
- Medium Saucepan: This will be the workhorse of the process, used to boil the eggs. A saucepan with a lid is preferable, as it helps maintain a steady temperature during cooking.
- Slotted Spoon: A slotted spoon is crucial for safely lowering the eggs into boiling water and removing them without getting scalded. It also minimizes the risk of cracking the shells prematurely.
- Bowl for Ice Bath: After boiling, the eggs need to be shocked in an ice bath to stop the cooking process immediately. Any large bowl will do, but make sure it can hold enough water and ice to submerge all your eggs.
- Timer: Precise timing is essential in achieving the perfect texture for your yudetamago, whether you aim for soft, medium, or hard-boiled. A simple kitchen timer or even a smartphone timer will work perfectly.
- Measuring Spoons: To accurately measure out the sea salt and any optional seasonings like soy sauce, sesame seeds, or chili flakes, you’ll need a set of measuring spoons.
Once you have these tools ready, you’re all set to tackle the delightful project of making shio yudetamago. By following the upcoming steps with precision, you’re bound to create a set of beautifully seasoned, boiled eggs that can enhance any meal or serve as a delectable snack on their own.
Preparation Before Cooking
Before we dive into the heart of cooking, let’s ensure everything is set for a smooth experience. Preparing our ingredients and understanding the process is key to making the perfect shio yudetamago.
Washing the Eggs
First, we’ll need to gently wash the eggs under cold running water. It’s essential to do this carefully to remove any impurities from the shell without cracking them. Ensure each egg is clean and ready for boiling. This step is crucial for hygiene and ensures our shio yudetamago turns out perfectly.
Preparing the Brine Solution
Let’s shift our focus to preparing the brine solution that gives shio yudetamago its unique taste. For this, we’ll need:
- 4 cups of water
- 1/2 cup of sea salt
In a large bowl, mix the water and sea salt until the salt is completely dissolved. This saline solution is what we’ll eventually use to season our boiled eggs, giving them that beautiful, subtle flavor that makes shio yudetamago a delightful treat. If you’re opting to enhance the flavor with additional ingredients like light soy sauce, toasted sesame seeds, spring onions, or chili flakes, have those ready as well, but they will be added later, after the eggs are cooked and peeled.
Instructions
Let’s get into the heart of making shio yudetamago, where we’ll focus on the cooking and cooling processes to achieve that perfect taste and texture.
Cooking the Eggs
- Fill a medium saucepan with enough water to cover the eggs and bring it to a boil over medium-high heat. While waiting for the water to boil, take a moment to gently prick the bottom of each egg with a pin. This step helps prevent the eggs from cracking during cooking.
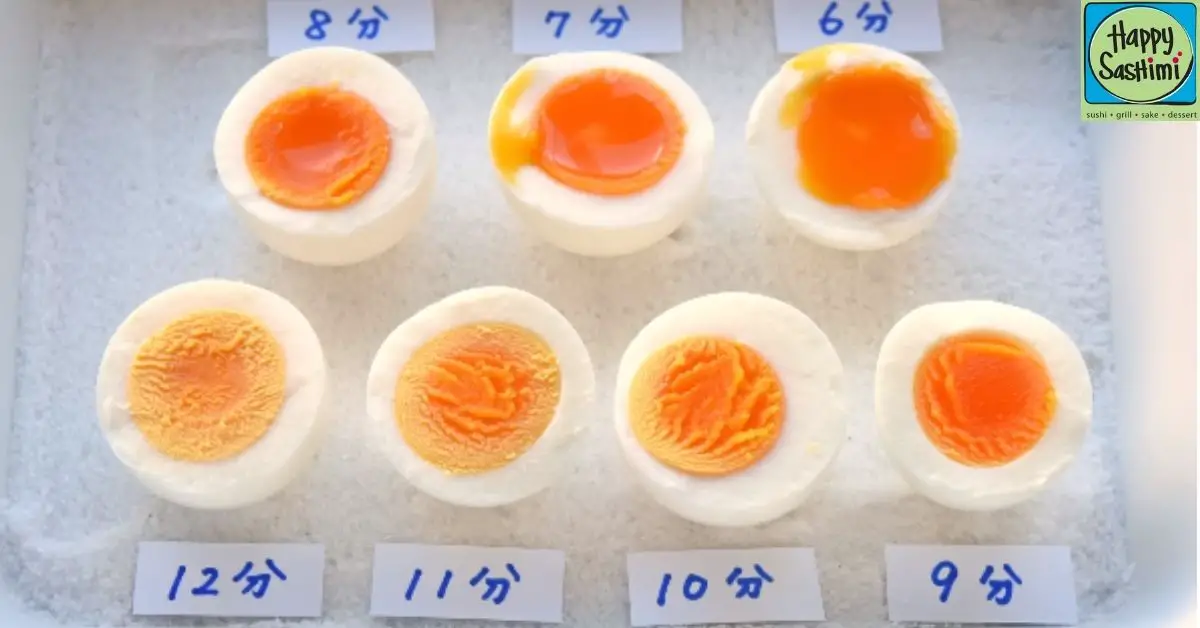
- Once the water reaches a rolling boil, carefully lower the eggs into the saucepan using a slotted spoon. Adjust the heat to maintain a gentle boil and set a timer for 7 minutes for soft-boiled eggs, or 10 minutes if you prefer harder yolks.
- While the eggs cook, prepare the ice bath. Fill a large bowl halfway with cold water and ice cubes. The ice bath will stop the cooking process immediately, ensuring your eggs have that desirable texture.
- Keep an eye on the timer. As the eggs cook, you can prepare the brine solution if you haven’t done so already. Mix 2 tablespoons of sea salt with 4 cups of water in a separate container, stirring until the salt is completely dissolved.
Cooling and Marinating the Eggs
- As soon as the timer goes off, use the slotted spoon to transfer the eggs from the hot water to the prepared ice bath. Let them cool in the ice bath for at least 3 minutes. This shock cooling halts the cooking process and makes the eggs easier to peel.
- After the eggs have cooled, gently crack the shell and peel under running water to help remove any tiny shell fragments.
- Once peeled, place the eggs in the previously prepared saltwater brine. For a subtle saltiness, you can soak them for about 10 minutes. If you prefer a more pronounced flavor, feel free to leave them in the brine for up to 30 minutes. Just remember, the longer the eggs sit in the brine, the saltier they will become.
- After soaking, remove the eggs from the brine and pat them dry with a paper towel. They are now ready to be served. Optionally, you can slice the eggs into halves or quarters and sprinkle them with toasted sesame seeds, chopped spring onions, and a touch of light soy sauce or chili flakes for an extra flavor boost.
Serving Suggestions
Once the shio yudetamago is ready, we have a couple of delightful ways to enjoy this savory treat. Whether you prefer them plain or dressed up with garnishes, these eggs are a versatile addition to any meal.
Plain
Savor the simplicity of shio yudetamago by serving them as is. The subtle saltiness and the creamy texture of the egg are perfect on their own. Pair with a hot cup of green tea for a classic Japanese breakfast or a light snack. The beauty of shio yudetamago lies in its minimalism, allowing the delicate flavors and textures of the egg to shine through without the need for additional embellishments.
With Garnishes
If you’re looking to elevate your shio yudetamago, a few garnishes can add exciting flavors and textures. Sprinkle lightly with toasted sesame seeds for a nutty aroma or add finely chopped spring onions for a fresh, crunchy contrast. A drizzle of soy sauce or a dab of wasabi can also enrich the eggs with a quintessential Japanese umami flavor. For those who enjoy a bit of spice, a sprinkling of chili flakes can add a warm, spicy kick. These garnishes not only enhance the taste but also make the dish visually appealing, creating a feast for the senses.
Make-Ahead and Storage
Shio yudetamago is a versatile dish that can easily be prepared in advance and stored for later enjoyment. Let’s explore the best practices for keeping these savory eggs fresh and delicious.
Refrigeration
After soaking the shio yudetamago in the saltwater brine and patting them dry, you can store them in the refrigerator to extend their shelf life. Place the eggs in a tightly sealed container or a zip-top bag to prevent them from absorbing odors from other foods. Properly stored, the eggs will keep in the refrigerator for up to 4 days. For the best flavor and texture, we recommend letting the eggs sit at room temperature for a few minutes before serving if you’ve chilled them for an extended period.
Freezing Instructions
While freezing is not typically recommended for shio yudetamago due to potential changes in texture, it is possible if you plan to use the eggs in cooked dishes where the texture change would be less noticeable. If you decide to freeze them, first peel the eggs and wrap each one individually in plastic wrap, ensuring no air is trapped. Then, place the wrapped eggs in a freezer bag, squeezing out as much air as possible before sealing. Frozen shio yudetamago can be kept for up to 1 month for optimal quality. Thaw the eggs in the refrigerator overnight before use. Remember, the texture of the eggs may change, making them best suited for recipes where they are mixed with other ingredients.
Conclusion
We’ve explored the delicate balance of flavors and textures that make shio yudetamago a must-try for anyone looking to dive into Japanese cuisine. With the right technique and a bit of patience, we can all enjoy this simple yet sophisticated dish at home. Remember, whether you’re planning to eat them right away or save them for later, proper storage is key to maintaining their quality. So let’s get those pots boiling and give our meals a delicious, savory boost with these perfectly seasoned eggs. Happy cooking!
Related Posts:
