We’ve all experienced the joy of discovering a dish that’s not only delicious but also carries a rich history and tradition. Today, we’re diving into the world of Tokoroten, a Japanese jelly-like dish that’s as fascinating as it is refreshing. Often enjoyed during the hot summer months, Tokoroten offers a unique culinary experience that’s rooted in simplicity and elegance.
This dish, made from agar-agar, is a testament to the beauty of minimalistic Japanese cuisine. It’s a cool, slippery treat that slides down your throat, leaving a subtle, savory taste that’s often enhanced with a variety of sauces. Whether you’re a long-time fan or a curious newcomer, we’re excited to share our take on this traditional recipe. Let’s embark on this culinary journey together, exploring the simplicity and delight of making Tokoroten at home.
Ingredients
Gathering the right ingredients is the first step to making delightful Tokoroten at home. Let’s dive into what you’ll need.
For Tokoroten
- 4 cups of water
- 10 grams of agar-agar powder (or agar strips if available, then soaked in water for an hour and drained)
- Optional: A pinch of salt to enhance the flavor
For the Sauce
Soy Sauce-Based:
- 1/2 cup of soy sauce
- 2 tablespoons of rice vinegar
- 1 tablespoon of sugar
- Optional: A pinch of wasabi or grated ginger to add a zesty kick
- 1/2 cup of water
- 1 cup of sugar
- 1/2 teaspoon of grated ginger or lemon zest for an aromatic twist
Choose your sauce based on your preference for a savory or sweet Tokoroten experience.
Equipment Needed
Embarking on your Tokoroten adventure? Great choice! To ensure a flawless preparation experience, you’ll need a few kitchen tools on hand. Here’s what we recommend gathering before you start:
- Medium Saucepan: Ideal for dissolving the agar-agar in water and bringing the mixture to a boil. A saucepan with a thick bottom is preferable to prevent any scorching.
- Measuring Cups and Spoons: Accuracy is key, especially when measuring out the agar-agar powder and ingredients for your chosen sauce. These will help ensure you get the right balance of flavors.
- Whisk or Wooden Spoon: Essential for stirring the agar-agar mixture and ensuring it dissolves completely without any lumps.
- Tokoroten Press: The star of the show. This tool pushes the jelly through to create the traditional noodle-like shapes. If you don’t have a Tokoroten press, a clean syringe (without the needle) or a small, perforated mold can work as makeshift alternatives.
- Shallow Dish or Tray: Once your mixture is ready, it needs to be poured into a dish or tray to cool and set. We recommend a shallow one for quicker cooling.
- Refrigerator: Not exactly ‘equipment,’ but you’ll need this to chill the Tokoroten until it’s firm and jelly-like.
- Bowls or Serving Dishes: For serving the Tokoroten. Whether you prefer it in long noodles or cut into chunks, having these on hand will make serving a breeze.
- Small Pots or Bowls: If you’re preparing both savory and sweet sauces, you’ll need separate containers to mix and heat them.
Preparation Steps
Now that we’ve got all our tools ready, it’s time to dive into the fascinating process of making Tokoroten. Follow these detailed steps for a smooth and successful preparation.
Making Agar-Agar Mixture
- Begin by measuring 4 cups of water and pouring it into the medium saucepan. Heat it over a medium flame until it’s warm but not boiling.
- Carefully add 2 teaspoons of agar-agar powder to the warm water. If you’re using agar-agar flakes, remember to adjust the quantity accordingly—typically, 1 teaspoon of powder is equivalent to 1 tablespoon of flakes.
- Whisk the mixture gently to dissolve the agar-agar completely. This step is crucial for ensuring a smooth texture in your Tokoroten.
- Once the agar-agar is fully dissolved, bring the mixture to a boil. Then, reduce the heat and let it simmer for about 2-3 minutes, stirring occasionally. This process helps activate the gelling properties of agar-agar.
- After simmering, remove the saucepan from the heat. Let the mixture cool slightly for about 5 minutes, allowing it to start setting.
Setting and Chilling the Tokoroten Mixture
- Carefully pour the slightly cooled agar-agar mixture into the shallow dish. The thickness of your Tokoroten depends on how shallow or deep your dish is, so choose accordingly.
- Let the dish sit at room temperature until the mixture is cool and begins to set. This usually takes about 20-30 minutes. Avoid disturbing the mixture to ensure it sets evenly.
- Once the mixture reaches a soft set and is cool to the touch, cover the dish with plastic wrap. Transfer it to the refrigerator and chill until fully set, usually about 2 hours.
- After the mixture has completely solidified, it’s time to use the Tokoroten press. Gently unmold the set agar-agar onto a clean, flat surface. Cut it into manageable blocks if necessary to fit your Tokoroten press.
- Position the Tokoroten press over a serving bowl, and press the agar-agar blocks through the device. This will create the traditional noodle-like strands typical of Tokoroten.
- Serve immediately or chill the Tokoroten strands in the refrigerator until ready to enjoy. Remember, you can savor them in both sweet and savory versions, so feel free to prepare your preferred sauce or topping before serving.
Directions
Embarking on the journey to create Tokoroten begins with two critical steps: crafting the perfect jelly and then transforming it into delightful noodle-like strands. Let’s dive into the detailed process.
Cutting Tokoroten
After your agar-agar mixture has fully set and chilled, forming into a firm, jelly-like texture, it’s time to transform it into the iconic Tokoroten noodles. Begin by carefully removing the set agar from the shallow dish onto a cutting board. If you’re using a traditional Tokoroten press, cut the jelly into manageable blocks that fit the width of your press. Place a block of the jelly into the press and gently push it through onto a serving plate, creating beautiful, translucent noodles. Repeat this process with the remaining jelly, immersing yourself in the captivating transformation from simple ingredients to a visually stunning dish.
Preparing the Sauce
Tokoroten is best enjoyed with a flavorful sauce that complements its refreshing, subtle taste. For a traditional experience, we recommend preparing two popular Japanese sauces: soy sauce-based and a sweet vinegar sauce.
1. Soy Sauce-based Sauce:
- In a small bowl, mix together 4 tablespoons of soy sauce, 2 tablespoons of mirin (a type of sweet Japanese rice wine), and a dash of wasabi (adjust according to your preference for heat). Stir well until the wasabi is fully incorporated into the sauce. This umami-rich sauce adds a savory depth to the Tokoroten.
2. Sweet Vinegar Sauce:
- Combine 3 tablespoons of rice vinegar, 2 tablespoons of water, 1 tablespoon of sugar, and a pinch of salt in another bowl. Stir until the sugar and salt are completely dissolved. This sauce offers a refreshing, tangy contrast that balances the subtle flavors of the Tokoroten noodles.
Offer both sauces to your guests, allowing them to choose according to their taste preferences. Each sauce provides a different gastronomic experience, enhancing the enjoyment of this classic Japanese dish.
Serving and Garnish
Once you’ve mastered the art of making Tokoroten, the fun part begins: serving and adding garnishes to elevate this dish even further.
Serving Suggestions
Tokoroten is best enjoyed cold, making it an impeccable choice for hot summer days. We recommend chilling the Tokoroten strands in the refrigerator for at least an hour before serving. This not only enhances the refreshing qualities of the dish but also ensures it maintains its firm texture. When ready to serve, divide the chilled Tokoroten noodles among individual bowls.
At this stage, you have the freedom to customize the dish according to your taste preferences or those of your guests. Offer the two traditional sauces we prepared—soy sauce-based and sweet vinegar—on the side, allowing everyone to dress their Tokoroten to their liking. The contrasting flavors provide a delightful culinary experience, catering to both savory and sweet preferences.
Additional Garnishes
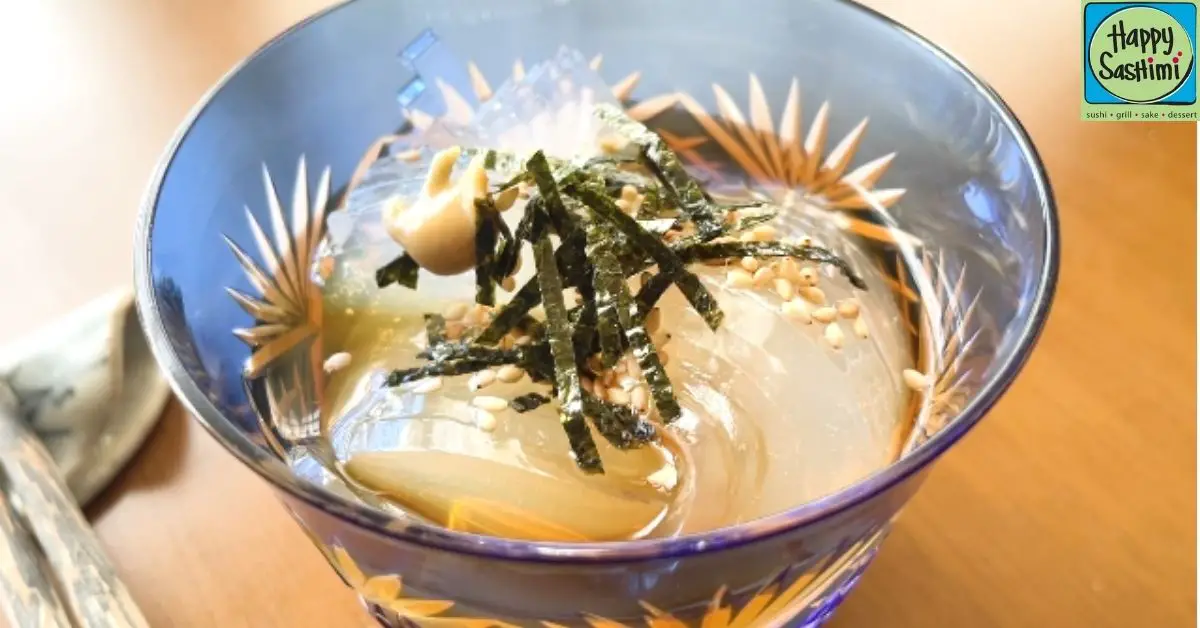
To further personalize your Tokoroten, consider adding various garnishes that complement the dish’s texture and flavors. Here are some recommended additions:
- A sprinkle of sesame seeds: Adds a subtle nuttiness and an extra crunch that contrasts beautifully with the smooth texture of the Tokoroten noodles.
- Chopped green onions: Introduce a fresh, sharp flavor that cuts through the sweetness of the vinegar sauce or the saltiness of the soy-based sauce.
- Grated ginger: Offers a zesty kick that pairs wonderfully with the cool and bland nature of the Tokoroten, invigorating the dish with a warm, spicy note.
- Shiso leaves: If available, thinly sliced shiso leaves can provide a unique, mint-like aroma and a hint of color, enhancing the dish both visually and gustatorily.
The beauty of Tokoroten lies in its versatility. Feel free to experiment with other garnishes based on your taste preferences or what you have on hand. Whether opting for a more traditional presentation or a modern twist, your Tokoroten is sure to delight.
Make-Ahead and Storage
Tokoroten is a fantastic dish to prepare in advance, especially during the hot summer months when you crave something cool and refreshing. Here’s how you can make Tokoroten ahead of time and store it for later enjoyment.
Make-Ahead Instructions
Preparing Tokoroten in advance is incredibly simple. After shaping the tokoroten noodles using the agar mixture, immediately transfer them to an airtight container filled with cold water. This step ensures the noodles remain hydrated, crisp, and ready to serve at a moment’s notice. You can prepare tokoroten up to 24 hours before you plan to serve, allowing the flavors to meld and the noodles to chill thoroughly in the refrigerator. Before serving, drain the noodles well and rinse them under cold water to refresh their texture.
Storage Tips
For storing leftover tokoroten, follow these guidelines to maintain its quality and freshness:
- Place the tokoroten noodles in a clean, airtight container.
- If you haven’t already, add enough cold water to cover the noodles entirely. This process helps keep them hydrated and prevents them from sticking together.
- Seal the container tightly and refrigerate. Tokoroten will keep well in the refrigerator for up to 3 days. Remember, the texture might slightly change over time, becoming a bit firmer, but it will still be delicious.
- Before serving again, check the noodles for any signs of spoilage, such as an off-smell or discoloration. If everything seems fine, drain and rinse the noodles under cold water to revive their refreshing texture.
These make-ahead and storage tips allow you to enjoy tokoroten at its best, guaranteeing a cool, refreshing treat ready whenever you desire.
Conclusion
We’ve walked through the delightful journey of making Tokoroten, a dish that’s as fun to prepare as it is to eat. With its refreshing taste and unique texture, it’s a perfect addition to your summer menu. Remember, the key to a great Tokoroten lies in the chilling and the creative play with garnishes. Whether you’re sticking to traditional sauces or experimenting with your favorite toppings, there’s no right or wrong way to enjoy this dish. And don’t forget, it’s not just about the taste—it’s about the experience. From preparing the agar-agar to pushing the jelly through the press, making Tokoroten is a culinary adventure worth sharing. So gather your ingredients, invite some friends over, and dive into the refreshing world of Tokoroten. Here’s to a dish that’s sure to bring a smile to your face and a cool respite to your summer days. Happy cooking!
Related Posts:
- Wagyu Beef Sushi Guide: How to Craft the Ultimate Luxury Bite
- Beef Curry Udon: A Complete Guide to Making, Storing & Health Tips
- Miso Butter Udon: A Guide to Making & Serving this Creamy Delight
- Is Miso Soup Keto? A Complete Guide to Macronutrients & Health Benefits
- Easy Tokoroten Recipe: A Refreshing Japanese Noodle Delight
