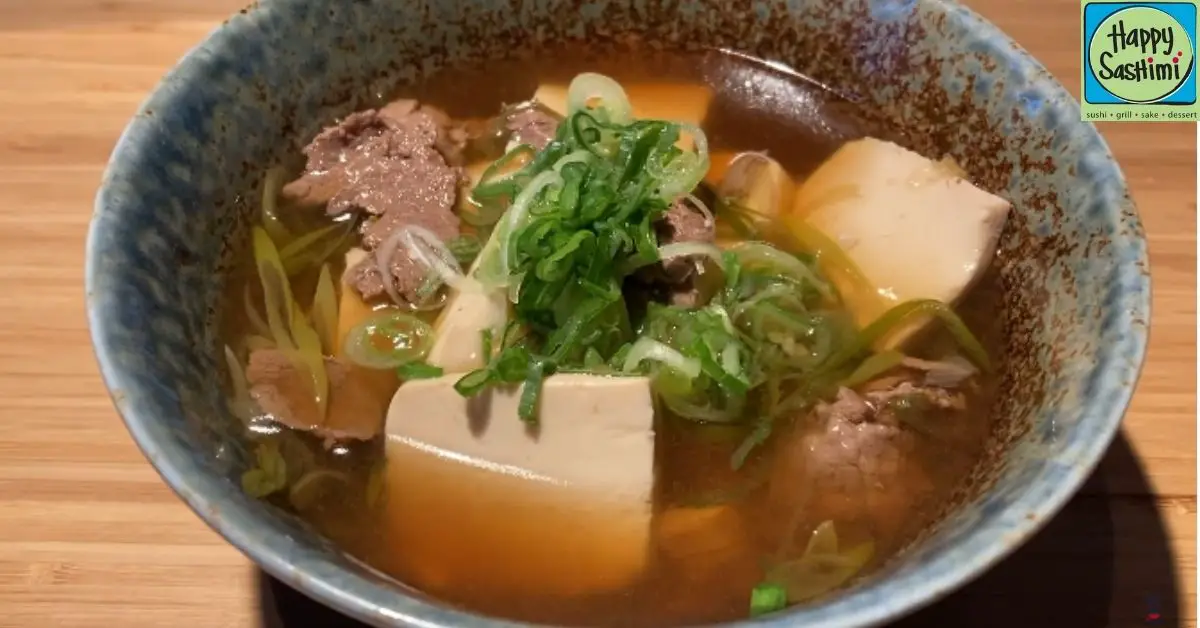
We’ve all had those days when we crave something warm, comforting, and utterly delicious. That’s when we turn to the heartwarming bowl of nikusui, a Japanese soup that’s both simple and soul-satisfying. This dish, with its tender pieces of meat and a broth that’s rich with umami, has a way of making any day feel a bit brighter.
Nikusui isn’t just about its taste; it’s a culinary journey to Japan from the comfort of our kitchens. With roots deep in Japanese cuisine, this dish offers a delightful glimpse into the simplicity and elegance of Japan’s food culture. It’s amazing how a few ingredients can come together to create something so flavorful and comforting.
So, let’s dive into the world of nikusui together. We promise, by the end of this journey, you’ll have a new favorite to add to your recipe collection.
Ingredients
Continuing our journey into the heart of Japanese cuisine, we’ll start by gathering all the necessary ingredients for our Nikusui recipe. This ensures we have everything we need to bring this comforting soup to life.
For the Soup Base
- 4 cups of water
- 2 tablespoons of soy sauce
- 1 tablespoon of sake
- 1 teaspoon of mirin (sweet rice wine)
- 1 dashi packet (or 1 tablespoon of dashi powder)
- 2 teaspoons of sugar
- Salt, to taste
For the Nikusui Balls
- 1/2 pound of ground pork
- 1/2 pound of ground chicken
- 1/4 cup of finely chopped green onions
- 2 tablespoons of grated ginger
- 1 egg
- 2 tablespoons of soy sauce
- 1 tablespoon of sake
- 2 teaspoons of cornstarch
- Salt and pepper, to taste
For Garnishing and Serving
- 1/2 cup of thinly sliced carrots
- 1/2 cup of sliced shiitake mushrooms
- 1/2 cup of diced tofu
- Chopped green onions, for serving
- Shichimi togarashi (Japanese seven spice), for serving
With our ingredients ready, we’re set to bring the flavors of Japan into our kitchens. Let’s move on to preparing our Nikusui soup, where each step builds on the last, culminating in a dish that’s sure to warm both body and soul.
Equipment Required
Embarking on the culinary journey of preparing nikusui, we’ll need a few essential pieces of equipment to ensure our cooking process is as smooth and efficient as possible. Let’s gear up for creating this soul-warming soup with the right tools in our kitchen.
Large Pot
First and foremost, a large pot is crucial for preparing the broth and cooking the nikusui. It should be spacious enough to accommodate all the ingredients without overcrowding, allowing the flavors to meld beautifully.
Mixing Bowls
A set of mixing bowls comes in handy when preparing the nikusui balls. We’ll use these for combining the ground meat, green onions, ginger, and seasonings before forming them into balls. Having a few sizes allows for easy mixing and handling of the ingredients.
Measuring Cups and Spoons
Accuracy is key to achieving the perfect balance of flavors in nikusui. Measuring cups and spoons will help us precisely measure the water, soy sauce, sake, mirin, and seasonings for the broth, ensuring the soup has the right umami depth.
Cutting Board and Knife
A sharp knife and sturdy cutting board are indispensable for prepping the carrots, shiitake mushrooms, tofu, and garnishes. Properly sized and shaped ingredients not only cook more evenly but also enhance the soup’s aesthetic appeal.
Ladle
To serve the nikusui, a ladle is essential. It allows us to scoop up the generous portions of broth, meatballs, vegetables, and tofu, creating the perfect bowl of soup every time.
Fine Mesh Strainer (Optional)
For those who prefer a clearer broth, a fine mesh strainer can be used to skim off any foam or impurities that rise to the surface during cooking. Although optional, it’s a useful tool for achieving a more refined presentation.
Preparation Steps
Embarking on the journey to craft the heartwarming nikusui, we delve into the preparation steps that bring its flavors to life. Here’s how we’ll create each component, ensuring our soup has depth, richness, and perfectly tender bites in every spoonful.
Making the Soup Base
First, fill a large pot with about 6 cups of water and set it over medium heat. As the water begins to warm, add in 2 tablespoons of soy sauce, 1 tablespoon of mirin, and a pinch of salt for an initial layer of flavor. Carefully place a strip of kombu (dried kelp) into the water, allowing it to simmer, but make sure it does not boil, as this can make the broth bitter. After about 10 minutes, remove the kombu. Now is when we add the magic ingredient: gently toss in a handful of katsuobushi (dried bonito flakes) and let them steep for 5 minutes to infuse the broth with its signature umami richness. Use a fine mesh strainer to skim off the bonito flakes, leaving behind a clear, flavorful base for our nikusui.
Preparing the Nikusui Balls
In a mixing bowl, combine 1 pound of ground pork with 1 finely chopped green onion, a teaspoon of minced ginger, and 1 minced garlic clove to add a burst of flavors to our meatballs. We’ll integrate a tablespoon of soy sauce and a teaspoon of sesame oil, ensuring every bite is infused with depth and richness. Mix in an egg and 2 tablespoons of cornstarch to bind the ingredients, creating a mixture that’s easy to shape. With damp hands, form the mixture into small, bite-sized balls. Once the soup base is ready, gently drop these meatballs into the simmering broth, cooking them until they’re beautifully tender and thoroughly cooked through, about 10 to 15 minutes.
Pre-Chopping Vegetables
While our soup base gently bubbles and our meatballs turn succulent in the simmering broth, we’ll prepare the vegetables that will accompany our nikusui, turning it into a nutritious meal. Grab a knife and chop 1 carrot and 2 stalks of celery into thin slices, aiming for uniformity for even cooking. Slice a half head of Napa cabbage into strips, and if you’re feeling adventurous, julienne some daikon radish for an added crunch and peppery bite. These vegetables, once added to the soup, will cook quickly, retaining their vibrant color and injecting the broth with their fresh flavors. Keep them aside until the meatballs are nearly cooked, then add them to the pot, simmering everything together until the vegetables are just tender, enveloping our nikusui with a harmony of tastes and textures.
Cooking Instructions
Let’s dive into the heart of making nikusui, where we’ll combine the rich flavors of our ingredients with simple, traditional techniques to create a soup that’s both comforting and delicious.
Cooking the Soup Base
- Start with the Broth: In a large pot, bring 6 cups of water to a gentle simmer over medium heat. Carefully add the pre-soaked kombu and continue to simmer for about 10 minutes to extract its flavors.
- Infuse the Umami: Remove the kombu with tongs, making sure to avoid tearing it. Add 1/4 cup of soy sauce, 2 tablespoons of mirin, and a handful of katsuobushi flakes into the simmering water. Stir gently to combine and infuse the broth with umami richness.
- Strain for Clarity: After letting it simmer for an additional 5 minutes, use a fine mesh strainer to remove the katsuobushi flakes. This will ensure our broth is clear and clean-tasting, providing a perfect base for our nikusui.
Cooking Nikusui Balls
- Prepare the Mixture: In a mixing bowl, combine 1 pound of ground pork, 2 finely chopped green onions, 1 teaspoon of grated ginger, and 1 minced garlic clove. Season with salt and pepper to taste.
- Form the Balls: Wet your hands slightly to prevent sticking, and form the mixture into bite-sized balls. This will make them easier to eat once in the soup.
- Cook in Broth: Gently place the nikusui balls into the simmering broth. Allow them to cook for about 10 minutes, or until they’re firm to the touch and fully cooked through. The meatballs will subtly absorb the flavors of the broth, enhancing their taste.
Add the Vegetables
- Add the Vegetables: With the nikusui balls cooked, it’s time to introduce our pre-chopped vegetables to the pot. Add 1 cup of sliced carrots, 1 cup of chopped celery, 1 cup of roughly chopped Napa cabbage, and 1 cup of sliced daikon radish. Simmer for an additional 10-15 minutes, or until the vegetables are tender.
- Final Adjustments: Taste the broth and adjust the seasoning with more soy sauce or a pinch of salt if necessary. The balance of flavors is key to the final taste of our nikusui.
- Serve Warm: Ladle the hot soup into bowls, making sure to get a good mix of meatballs and vegetables in each one. Serve immediately to enjoy the full spectrum of flavors and warmth that this traditional Japanese soup offers.
Following these steps will not only allow us to pay homage to the rich culinary tradition of Japan but also enjoy a bowl of nikusui that warms the heart and soul. Each ingredient plays a crucial role, contributing to the soup’s depth of flavor and comforting qualities.
Serving Suggestions
Now that our nikusui is ready, let’s talk about how to serve it to truly honor its flavors and make it a memorable meal.
Accompaniments
Pairing the right side dishes with nikusui can elevate this meal into a feast for the senses. We recommend serving it with a bowl of steamed rice to soak up the delicious soup. For a well-rounded meal, add a side of pickled vegetables such as radish or cucumber for a refreshing crunch that contrasts beautifully with the savory soup. If you’re looking to keep everything traditional, a small dish of tamagoyaki (Japanese sweet omelet) could add a delightful sweetness and protein. These accompaniments not only complement the flavors of the nikusui but also ensure a balanced nutritional profile.
Garnishing Tips
A beautifully garnished bowl of nikusui not only enhances its flavors but also its visual appeal. Before serving, sprinkle some finely chopped green onions on top for a fresh, sharp taste that cuts through the richness of the broth. A few drops of sesame oil can add a nutty aroma, deepening the overall flavor of the dish. For those who enjoy a bit of spice, a light sprinkle of shichimi togarashi (Japanese seven spice blend) can introduce a pleasant heat and complexity. Lastly, for a citrusy undertone, a little zest of yuzu or lemon can brighten up the hearty soup, creating a perfect harmony of flavors in every spoonful.
Storage and Reheating Tips
Storing and reheating nikusui correctly is key to preserving its taste and texture for later enjoyment. Here, we’ll guide you through the best practices to ensure your nikusui remains as delightful as when it was first made.
Storing Leftover Nikusui
- Cool it Down: Allow the nikusui to cool down to room temperature before storing. However, don’t leave it out for more than 2 hours to avoid bacterial growth.
- Separate Components: If possible, store the broth and nikusui balls separately. This step is crucial to maintaining the quality of the meatballs and the integrity of the broth.
- Airtight Containers: Transfer the cooled soup and meatballs into airtight containers. Glass containers are preferred as they don’t absorb flavors and are easier to check contents.
- Refrigeration: Place the containers in the refrigerator. Nikusui can be kept for up to 3-4 days when refrigerated properly.
Freezing Nikusui
- Freeze Separately: Freeze the broth and nikusui balls in separate airtight containers or freezer bags. This method helps in retaining the texture of the meatballs and the broth’s flavor profile.
- Label Containers: Always label the containers with the freezing date. Nikusui can be stored in the freezer for up to one month.
- Thawing: When ready to eat, transfer the frozen nikusui from the freezer to the refrigerator to thaw overnight. Avoid thawing at room temperature to prevent bacterial growth.
Reheating Nikusui
- Thaw Completely: Ensure the nikusui, whether from the refrigerator or freezer, is completely thawed.
- Low to Medium Heat: Transfer the nikusui to a pot and reheat on low to medium heat. Avoid boiling vigorously as it can affect the meatballs’ texture and soup’s clarity.
- Stir Occasionally: Stir the soup occasionally to ensure even heating and to prevent ingredients from sticking to the bottom of the pot.
- Taste and Adjust: After reheating, taste the nikusui and adjust the seasoning if necessary. Sometimes, a dash of soy sauce or a sprinkle of salt can refresh the flavors.
- Serve Immediately: Once heated through, serve the nikusui immediately. Reheating multiple times
Conclusion
We’ve walked through the delightful journey of making nikusui, a dish that not only warms the belly but also the heart. Embracing the rich tapestry of Japan’s food culture, we’ve learned the significance of each ingredient and the care needed in preparation. Our tips on storage and reheating ensure that this comforting soup can be savored to the last drop, maintaining its soul-soothing flavors and textures. Whether you’re a seasoned chef or a curious cook, we hope nikusui finds a special place in your kitchen and on your dining table. Here’s to many more meals that bring us closer to the world and to each other. Happy cooking!
Related Posts:
